USE FOR
This product is part of system that helps purify certain airborne contaminants, including dust, pollutants, fine particles as well as other contaminants, welding dust and metal dust. Gas filter option suits users with specific working conditions. Supplying clean air to the user's facial.
Before using respirator - Check the following items.
- Blower Assembly Make sure the spark screen, pre-filter and particle filter (gas filter if any) are properly installed and securely latched.
- Breathing Tube Make sure tube is not damaged and connected locked to the blower unit and headtop.
- Battery Make sure the battery is fully charged before each use (the battery need to be charged before first use.) Check connection to blower unit is secure.
- Airflow rate test / Alarm sound check It's necessary to do both airflow rate test and alarm sound check before use. Testing method refers to “SELF CHECK BEFORE EACH TIME USE" on page 10.
DO NOT USE FOR
- This PAPR product is not suitable for the applications which request Intrinsic safety (1S).
- Oxygen deficient atmospheres.
- Contaminant generated in workplace and concentrations that are unknown orimmediately dangerous to life or health (IDLH).
- Oxygen concentration of the air in workplace is 17% or lower.Without complete assembling of the whole product, never use, which may cause danger for human life.
- Do not use in sealed place, in place with danger as fire, explosion.
- Do not use the product with its power turned off since carbon dioxide concentration may increase and oxygen level inside the face guard may decrease.
- Do not use if the product does not supply enough air. (MIN - 165 Ipm)
- Do not use at workplace with strong wind. (as negative pressure generated inside theheadtop, outside-air comes into the headtop) In the power-off state little or no respiratory protection is to be expected, and that this is considered to be an abnormal situation.
NOTICE
If bleeping alarmed, immediately get away from the contaminated area and check the device. The hose may get blocked; Battery low power; Filter is dirty and need get changed with new one.
Please EXIT that contaminated place in any cases below :
- IF some problem is shown in any part of the product, for example, the air supply is stopped or its amount is decreased.
- IF it gets hard to breathe, feeling dizzy or headache, feeling the smell or taste of the contaminants and its stimulus occurred.
- Never use in place with too high level of contamination.
- Make sure the connecting hosepipe smooth and is not entangled or is in the way of other items in the area.
- Don't remove the respirator until you are in a safe area.
- Operating temperature range between -5°C and 55°C.
- The TECMEN PAPR system is not intrinsically safe. Keep away from flammable, or explosive atmosphere. E At very high work rates the pressure in the device may become negative at peak inhalation flow. ]
- Do not confuse the European standard EN12941 with other standards.
MARKINGS ON THE EQUIPMENT
Only Button controlling both Power On / Off and Airflow switch
- Power 0n/Off. On—Press and hold for 3 seconds Off—Press and hold for few seconds until bleeping sounds finish.
- Airflow switch . Press the button to switch between More light spots turn on, more dirty it means. 170+Ipm and 210+Ipm
Indicator light refers to the airflow state. Two different levels: Low Speed—170+Ipm, High Speed—210+Ipm
Display screen indicates the battery capacity.
Warning lights help to check the filter status. More light spots turn on, more dirty it means. 170+Ipm and 210+Ipm When warring lights flash, pls. replace the filter.
RESPIRATOR SPECIFICATIONS
| Airflow Rate | Manufacturer's minimum design flow rate: 165+Ipm (5.8+cfm) | ||
| Low speed: 170+Ipm (6+cfm) | |||
| High speed: 210+Ipm (7.4+cfm) | |||
| Fast-charging Standard Battery | Battery type: rechargeable Li-ion battery | ||
| Battery duration: 9 h - low speed (170+lpm); 5-6 h - high speed (210+Ipm) | |||
| Battery charge time: 1 hour | |||
| Battery life: > 500 charges | |||
| Filter | Filter efficiency: 99.997% | ||
| Alarms: Visible, audible and vibrate | |||
| |||
| Temperature | Operating temperature: -5°C to 55°C (23°F to 131°F) | ||
| Storage temperature: -10°C to 55°C (14°F to 131°F) | |||
| Relative Humidity (R.H.) | Operating R.H.: < 90% | ||
| Storage RH.: < 85% | |||
| Weight | 1020g (Blower unit + fast-charging standard battery) | ||
| Respirator Approval | EN12941 (Classifications please refer to the label on headtop)AS/NZS1716: 2012 - FreFlow V1 (Classifications please refer to thelabel on particle filter )EAC |
ASSEMBLING & SPARE PARTS
The power must be tumed off when replacing the filters. Install the spark screen, pre-filter, and particle filter (gas filter if any) in filter cover.
Before installed, always make sure filter material is intact and dry with no tears or other damages. Install the filter cover assembly to the blower unit by engaging tabs on filter cover into bracket on blower unit and rotate assembly to close. Pushfilter cover assembly down until latch clicks into position securing filter cover assembly. Inspect both sides of cover to see that the filter cover is properly installed. To replace filter, push latch into release filter cover and replace filter as fig.1 shown.
When to replace the filter : If the filter gets blocked by contaminants, all the three points of warning lights will flash, accompanied with vibrate and bleeping sound. Please immediately exit contaminated environment and check the status.
PARTICULATE FILTER
WARNING
- Never use the respirator without the spark screen, pre-filter,and the HE particle filter (HEPA) installed.
- Always replace filter when damaged or blocked. Do not try to wash, clean or reuse dirty ones.
- Stored at a temperature between -10°C to 55°C (14°F to 131°F), in a clean environment without direct light.
- Remember not confuse the markings on a filter relating to any standard other than EN 12941 with the classification of this device when used with this filter.
- Please install the particle filter according to fig 2a.
- The time limit for the storage of new filters keptin their original packaging is 5 years.
GAS FILTER
WARNING
- This gas filter must be always used together with FreFlow particle filter. The gas filter give additional 3 = protection against certain gaseous environment (See the table below).
- The particle flter and gas filter cannot be cleaned. Stop using it immediately when smelling peculiar smell and replace it until you are in a safe area.
- Stored at a temperature between -10°C to 55°C (14°F to 131°F), in a clean environment without direct light.
- Please install the particle filter and gas filter according to fig.2b.
| Marking | Part No. | Color Code | Protection Against |
| P(RSL) | VIP3TM300 | White | Particulates (R=reusable, SL=test against sodium chloride and paraffin oil) |
| ATBIEIKI | VIGFTM300 | Brown / Grey / Yellow / Green | Oganic gases / Inorganic gases / Sulfur dioxide. acidic gases / Ammonia and organic ammonia derivatives |
| A2 | VIGFTM3 01 | Brown | Organic gas and vapor, boiling point > 65°C |
| Al | VIGF TM302 | Brown | Organic gas and vapor, boiling point > 65°C |
ODOUR FILTER INSTRUCTION
SYSTEM DESCRIPTION
Odour filteris an optional accessory for the TECMEN FreFlow PAPR. The odour filter helps to reduce nuisance odours during cutting, burning and welding applications.
WARNING
- This product is one component of an approved respiratory protection system. Always read and follow all UserInstructions supplied with system in order to ensure correct system operation. Failure to do so may result in injury, sickness, or death.
- The TECMEN FreFlow PAPR system is not intrinsically safe. Do not use in flammable or explosive atmospheres, doíng so may result in serious injury or death.
- Always correctly use and maintain the filter assembly. Failure to do so may reduce respirator performance, overexpose you to contaminants, and may result in sickness or death.
- The odour filter can not be cleaned. Stop using it immediately when smelling peculiar smell and replace it until you are in a safe area.
- Stored at a temperature between -10°C to 55°C (14°F to 131°F), in a clean environment without direct light.
ASSEMBLING THE ODOUR FILTER
Please install all the filter components according to the image below (See fig.3).
The odour filter must always be used with the particle filter, pre-filter and spark screen.Do not use the odour filter alone.
REPLACING THE ODOUR PAD
The odour pad may be replaced by pressing the expired odour pad out on the vertical edges, nearest to the frame edge, and then work the entire odour pad free from the assembly according to the image below (See fig.4a). Install a new odour pad by pressing it into the odour pad assembly (See fig.4b).
BATTERY
WARNING
- The battery should be charged in a place that is electrically safe.
- The charging time of different types of battery is different. Actual charging time depends on the remaining battery capacity.
- Please check out the voltage of the charger (AC 110V~220).
- Please separate the battery from the body before charging.
- Upon using-condition, the battery'slife may be slightly different.
Battery is divided into fast-charging standard battery and fast-charging extended battery. When these two types of battery are used with different filter components, the battery duration is different. Please choose the appropriate battery according to actual situation.
It is recommended to choose fast-charging extended baterry to match the gas filter
| Description | Part No. | Picture | Description | Part No. | Picture |
| Fast-charging standand bartery | VIFBA TNO 00 | Fast-charging battery charger | VIFBC TM3 00 | ||
| Fast-charging extended bartery | V1FEB TM3 00 |
Battery performance for different combinations of filter assembly
| Battery type | Battery charge time | Filter type | Airflow rate | Battery duration |
| Fast-charging standard battery | 1 h | Particle filter | 170+lpm | 9h |
| 210+lpm | 5-6h | |||
| Particle filter + Gas filter | 170+lpm | Not recommended | ||
| 210+lpm | ||||
| Fast-charging extended battery | 2 h | Particle filter | 170+lpm | 15h |
| 210+lpm | 9h | |||
| Particle filter + Gas filter | 170+lpm | 11h | ||
| 210+lpm | 7.5h |
Disassembling the battery
Push the button, take the battery out as ( fig.5a / 5b / 5c) shown direction. Separate it from the body.
Assembling the battery
Fitting the battery to the blower body, push until hearing “click" sound (See fig.6a / 6b).
Battery-charging
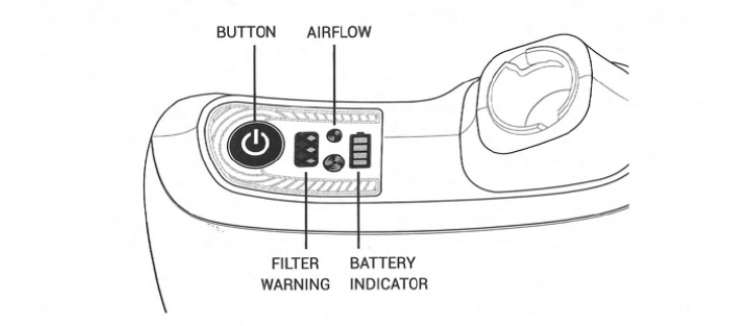
This indicator shows the baterry capacity.
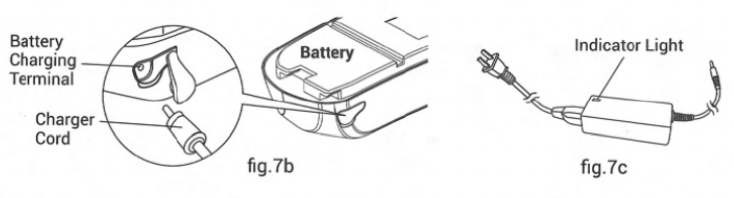
When four sections show up, the battery is fully charged. When just one section left (See fig.7a), bleeping sounds on, accompanied by vibration to remind users to stop work and get battery charged. The frequency is bleeping sounds occur every 30 seconds and vibration occurs every 2 minutes. After the warnings occur around 15 minutes, the battery indicator gets flashing, which shows there should be at most 15 minutes left before the blower off (Airflow low speed 170+Ipm). Remove battery pack from blower assembly. Connect charger cord to battery terminal (See fig.7b).
When the indicator light on charger turns from red to green (See fig.7c) , never stop it immediately and please keep charging for another 0.5h.
Notice of battery use
- Do not put PAPR unit with power-on in the package. It's better to remove the battery
from the body when put in the package. - Do not keep PAPR unit inside the car in hot summer season.
- Do not throw or give the high impact to PAPR unit.
- Do not put PAPR unit on the electric heat generating equipment.
- Do not use any other battery charger.
- Battery storage temperature: -10°C to 55°C (14°F to 131*F) , R.H.< 85% Recommended battery charging temperature: 0*C to 40°C (32*F to 104*F)
BREATHING TUBE
WARNING
- Always inspect the PAPR end of the breathing tube to confirm the rubber O-ring is in place, see fig.9a. Replace if missing or damaged.
- Be sure tube is properly installed and non-filtered air cannot enter the facial.
Assembling
Insert the two prongs on the breathing tube into blower unit and headtop receptacle (Seefig.8), twist 1/4 turn to the anti -"OPEN" direction to lock into place (See fig.9a).
Disassembling
Twist 1/4 to the “OPEN" direction and then take the prongs out from the end (See fig.9b) .
SHOULDER STRAP & BELT CUSHION
Connect hooks to belt (See fig.10a).
Connect with the blower by screw locking (See fig.10b/10c).
AIR FLOW CONTROL
Two indicator lights on display (See fig.11a). Low Speed-170+Ipm; High Speed-210+Ipm. When turn on the PAPR, default setting is low speed airflow; Switch the airflow by short press the button (See fig.11b).
ENTER AND EXIT CONTAMINATED AREA
Always exit the contaminated area immediately if any of the following conditions occur :
- IF some problem is shown in any part of the product, for example, the air supply is
stopped or its amount is decreased; - IFit gets hard to breathe, feeling dizzy or headache, feeling the smell or taste of the
contaminants and its stimulus occurred; - NEVER usein place with too high level of contamination. If you suspect the levels reach
a level which this respirator may no longer provide enough protection.
Respirator removal
WARNING
- Never remove the respirator in areas where the air is contaminated.
- Always take off the PAPR after you step out of the workplace.
Steps
- Take off headtop and disconnect tube from headtop.
- Turn off the blower by long press button.
- Release belt. Remove straps from shoulders and remove blower off of your lower back.
ENTER AND EXIT CONTAMINATED AREA
ALL THE TESTS MUST ALWAYS BE DONE IN A SAFE ENVIRONMENT.
Alarm sound check
After turning on the product, check the alarm sound warning function by blocking the air outlet as fig.12 shown in the picture above. The warning signal on the panel should flash with a sound and blower vibrate (approximately 15 to 30 seconds after the outlet is blocked). The product is working correctly if the warning functions follow the process above. (Please make sure the filter is equipped and the battery is fully charged before doing this test.)
Airflow rate test
Take airflow test always before using this product.
Make sure all the components are fully assembled before testing. Connect the end of hose to the bottom of airflow indicator and then start the button. Keep the airflow indicator vertical (See fig.13).
If the ball inside the pipe floating above the limited line in low speed mode, it proves normal function. If the ball cannot float up to limited line, please refer to Trouble-shooting Guide on page 12.
MAINTENANCE
The respirator components must be cleaned, inspected and prepared for next use after each use. Use soft cloth dippedin mild soap water for wiping. Be careful for the water NOT to get inside the body.
CLEANING
- Blower unit and battery pack: Clean the outer surfaces of the PAPR and battery pack with a soft cloth dampened in a solution of water and mild, pH neutral detergent. Be careful for the water NOT to get inside the body. Do not use solvents or abrasive cleaners. Ensure the electrical contacts of the motor/blower and battery pack are dry before assembling well.
- Breathing tube: Wiping the exterior is insufficient. Clean the outer hose and connection on the breathing tube with the soft cloth dipped in water and detergent solution. Optional breathing tube covers can also be used to facilitate cleaning. Ensure the breathing tube is completely dry before using or storing. They cannot be immersed in liquids for cleaning and must be replaced if wet.
- Filter: Open the filter cover and inspect all the filters and spark screen. The particle filter, gas filter and pre-filter cannot be cleaned. The spark screen can be cleaned using a clean, soft cloth dipped in a solution of water and a mild pH neutral detergent. Completely dry the spark screen with a clean cloth. Replace the pre-filter and particle filter ¡f excessively dirty, wet or damaged. Do not attempt to remove contamination using a compressed air line as this will automatically invalidate the warranty. If the spark screen cannot be cleaned or is damaged, replace with a new spark screen.
STORAGE
The TECMEN PAPR system is not intrinsically safe. Keep away from flammable, or explosive atmosphere. Storage should be in a clean, dry, cool place with filter.
Blower storage
Stored at a temperature between -10°C to 55°C (14°F to 131°F), in a clean environment without direct light.
Battery storage
To help maximize battery service life:
- Disconnect the charger after a full charge has been received.
- Battery should be removed from blower if long time storage. * Store the battery at -10°C to 55°C (14°F to 131*F), R.H. <85%, to get maximize battery service life.
TROUBLE-SHOOTING GUIDE
| Problems | Causes | Trouble-shooting |
| No airflow from blower | Blower not ON | Long press ON button. |
| Battery no power | Charge the battery. | |
| Battery not installed properly | Check and reassemble the battery. | |
| Tube blocked/air leakage | Check and clear the obstruction. | |
| Airflow test failed | The hose may get blocked/air leakage | Check the tube status. |
| Dirty filter needs replacement | Replace new filter. | |
| Battery time is too short even fully charged | Battery faulty | Replace new battery. |
| Incorrect charging | Fully charge battery. | |
| Blocked filter | Replace filter. | |
| Damaged charger | Replace a new charger. | |
| Increased sound level | Filter is getting clogged | Replace filter and pre-filter as required. |
| Warning indicator ON, blower vibrate and alarm sound bleeping | Tube gets blocked/air leakage | Check if tube/anywhere gets blocked before use. |
| Filter assembled without removing the package | Check if the package is removed. | |
| Feeling smell of incoming air | Damaged filter | Check the filter status and replace new one if needed. |
| Hose with leakage problem | Check how the tube assemble as well as status. | |
| Filter component not complete | Check and equip both filters. |
TROUBLE-SHOOTING GUIDE
| ITEM | PART NO. | DESCRIPTION |
| B. Blower Unit (+denotes alternative(s) available.) | ||
| B-1 | V1BM TM3 00 | Body |
| B-2 | VIFBA TM3 00 | Fast-charging standard battery |
| B-3* | VIFEB TM3 00 | Fast-charging extended battery |
| B-4 | V1P3 TM3 00 | Particle filter (HE filter) |
| B-5 | VIPF TM3 00 | Pre-filter |
| B-6 | V1SS TM3 00 | Spark screen |
| B-7 | VIFC TM3 03 | Filter cover |
| B-8 | VIFC TM3 01 | Filter cover |
| B-9* | VI1GF TM3 00 | Gas filter (A1B1E1K1) |
| VI1GF TM3 01 | Gas filter (A2) | |
| VIGF TM3 02 | Gas filter (A1) | |
| B-10 * | V10F TM3 00 | Odour filter |
| B-11 * | VIPA TM3 00 | Odour pad |
| ITEM | PART NO. | DESCRIPTION |
| C. Wears (+denotes alternative(s) available.) | ||
| C-1 | V1SH TM3 00 | Shoulder strap |
| C-2 * | V1BE TM3 00 | Belt cushion |
| C-3 * | VILBE TM3 00 | Leather belt cushion |
| C-4 * | VIBETM3 01 | Belt (Easy to clean) |
| ITEM | PART NO. | DESCRIPTION |
| D. Hose (+denotes alternative(s) available.) | ||
| D-1 | VI1HC TM3 00 | Hose cover |
| D-2 | V10R TM3 00 | O-ring |
| D-3 * | V1HO TM3 00 | Hose (Including O-ring) |
| D-4 * | VI1HO TM3 01 | Quick-connection Hose (Including O-ring) |
| ITEM | PART NO. | DESCRIPTION |
| E. Battery Charger | ||
| E | VIFBCTM3 00 | Fast-charging battery charger |
| ITEM | PART NO. | DESCRIPTION |
| F. Airflow Indicator (+denotes alternative(s) available.) | ||
| F-1 * | V1AI TM3 00 | Airflow indicator |
| F-2 * | V1QAI TM3 00 | Airflow indicator II |
Options with * are for reference only; please check the actual set for accurate information.